
Every man and his dog has a GoPro. That’s fine, it’s fantastic that people are so determined to capture moments in their lives and share them with friends. To go outside and do something even just slightly interesting. To be a hero.
Let’s back up a bit. Does anyone truly believe that tagline? It’s ingenious marketing nonetheless, it gives ordinary people the belief they can do crazy, viral video worthy things because they were inspired by GoPro’s latest launch video on Facebook.
We’ve all seen these exact victims of GoPro’s marketing strategy – tourists with their selfies sticks walking around a well known landmark filming what you can’t help but think will be the most boring travel video ever made.
So you’ve fallen into the same trap, we all have. You must ask yourself now, how will I get my $400 dollars worth? What can I do to make my GoPro edits stand out from the rest?
To be fair, you have to be doing something at least half decently exciting or slightly gnarly, but here’s how you can make even that look a hundred times better.
Shooting:
Film everything. Clear that SD card, as you’re going to need it all. The more you shoot, the more you have to play with in the editing suite. Sometimes you might capture a shot you didn’t expect to, and it might be the shot that makes or breaks an edit.
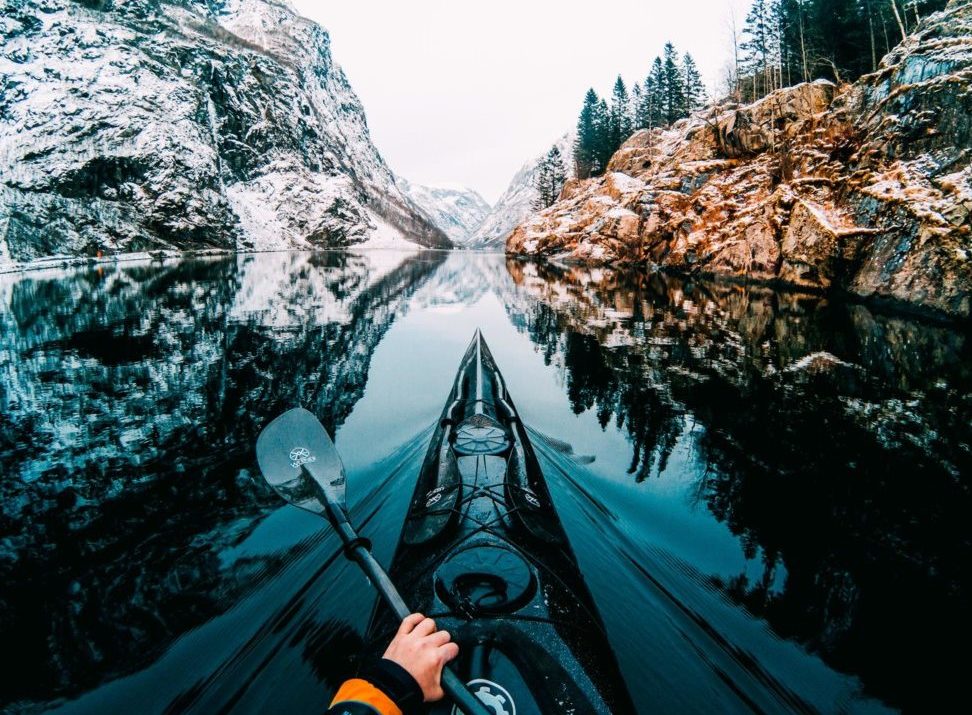
Change up the angles. No one wants to watch 3 minutes of footage just from your helmet cam or you throwing up a shakas with your selfie stick. Experiment with different mounts and use multiple cameras for the same sequence if you can collaborate with your mates.
It’s all about settings. Shoot in the highest quality possible on your model. In saying that, use the right setting for the shot. In particular, if you know you want to slow a particular shot down later on for dramatic effect, shoot in 720p w/ 120 frames per second. The more frames per second, the smoother the slow-mo shot is going to look. Don’t worry about the 720p being lesser quality, as you’re unlikely screening your edit at the local IMAX theatre.
Prime lighting conditions are make or break. Overcast days are not ideal. If you can wait 10 minutes for the cloud to pass and the sun to come out – do it. GoPros work tremendously well in good lighting, but aren’t your best friend if the weather gods are having a day off. Golden hour, the first hour and last hour of daylight, produces some quality colour contrasts.
Don’t use the waterproof housing (unless necessary, of course). If the case isn’t cleaned immaculately it could distort your footage, the sound quality is basically non-existent and the camera itself is heavier – making it harder to produce stable footage.
Stability is everything. Use a stabiliser if you can, the latest Karma release with the Hero 5 is a starting point, but other third party brands do produce the same product. Some further tips on making your footage more stable during editing are below, but help yourself out from the get-go and do everything you can to stabilise it during shooting.
Editing:
Software. We’re not all Dan Bilzerian or Devin Super Tramp, so put away your convoluted and unnecessary full production editing suites and take advantage of GoPro’s own studio software. Not only is it user friendly, but it’s made for GoPro, by GoPro, so you know that your raw files will need little tweaking to get them to look good.
Cut the bullshit. 95% of your footage, straight up, mostly sucks. The reality is, we’re not all hucking backflips in Chamonix or BASE jumping from Dubai’s tallest skyscrapers. This is OK, it just means that you have to use whatever interesting footage you have to your advantage and only pick the best of the best from your library.
Change it up. Not just the style of shots, but the speed and the grouping of sequences. In some cases, try keeping the shots from the same angles together (not all of them, maybe just 2 or 3 in a row) and then change to another angle.
Music is key. In most cases when we’re making edits, we don’t even start editing until we choose an appropriate tune. This way, you can time your cuts to the music, giving it a much more rhythmic and engaging edge. Make sure the tune is aptly chosen too, don’t rush it, as it might take you a while to find the right vibe.
Try Protune. In GoPro studio, if you have good lighting you should give the Protune setting a whirl. It doesn’t always work for the better (especially for darker, poorly lit shots), but when it does it removes the greyscale tint and gives your clips a cinematic glow.
Stabilise more. If your footage is particularly shaky, there isn’t much you can do after the fact. However, if it is only slightly jerky or bumpy, try zooming the frame inwards to reduce it. By changing the natural borders of the clip, it gives it a smoother feel – it’s the little things that make an edit a cut above the rest.
If you can combine some or all of these tips into your next edit you can easily create an end product like this example from our recent canyoning trip with Eagle Rock Adventures. It was filmed entirely on a GoPro Hero3+ and edited on GoPro Studio in just under an hour and a half.